
I consider WordPress Mobile Pack (WPMP) by James Pearce & friends to be the best plug-in for creating a mobile friendly version of your WordPress Blog. It detects mobile devices and serves them a compact, fast loading version of your blog. There’s a link to the full site on every page so mobile users aren’t locked into mobile formatted version.
And unlike some other mobile plugins that only work with the iPhone and other high end devices, WPMP detects all mobile browsers and serves them pages that work on everything from the latest Android phone to a five year old basic flip phone. The main reason it’s so compatible is that unlike most of the other mobile plugins it resizes images and splits up long pages to keep page sizes small which speeds up mobile browsing and ensures compatibility with the most basic of phones.
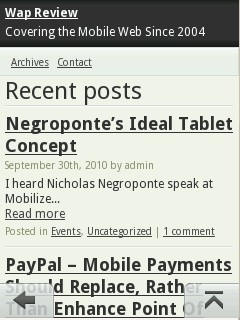
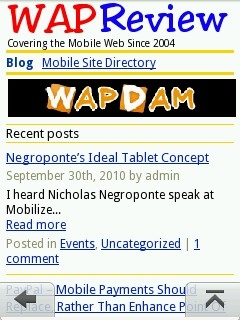
The only problem with WPMP is it’s too popular. I think the default WPMP theme (image, top left) looks great. But there are tens of thousands of blogs using it. I wanted my mobile blog to have its own unique branding and color scheme (image top, right). It turns out that’s pretty easy to do provided you have a basic understanding of CSS and PHP.
You could just go into WPMP and start modifying files to make it do what you want. The problem with that is that every time WPMP is updated (which is often) you will have to redo all your changes. There is a better way and that’s to create a custom WPMP theme. With a custom theme you can update WPMP without overwriting your changes. Here’s how.
Create a new folder in your WordPress theme directory (wp-content/themes/). Give the folder a meaningful name. I called mine mobile_pack_wapreview
Copy the style.css file from one of the WPMP child theme folders (mobile_pack_blue, mobile_pack_red or mobile_pack green) into to your custom theme folder.
Modify the style.css you copied into your custom theme folder. Start at the top. There’s a comment block at the very beginning that defines the theme to WordPress and WPMP. The only line of the comment block that you absolutely have to change is the theme name. Give it a unique name that you will recognize because that’s the way it will be listed in the Mobile Theme switcher in the WordPress Dashboard. You should probably also change the Description and Author fields as they are displayed on the Themes page of your WordPress Dashboard. You can also change the Theme URI, Version and Tags fields if you want. But don’t modify the line that says “Template: mobile_pack_base”.
Here’s what the comment block at the top of my custom theme’s style.css looks like.
/*
Theme Name: Mobile Pack WapReview
Theme URI: http://wapreview.mobi
Description: Custom WordPress Mobile Pack theme for WapReview
Author: Dennis Bournique, hat tip to James Pearce and Andrea Trasatti for creating WPMP
Version: 0.1
Template: mobile_pack_base
Tags: none
*/
At this point you have created a custom theme. You should be able to select it as your Mobile Theme on the Mobile Switcher page of your WordPress Dashboard. On course, because you haven’t actually changed of any CSS or code yet your new theme will look exactly like the one you copied style.css from.
The way WPMP handles styles.css is that it loads the copy in the mobile_pack_base folder first and then it loads style.css from your custom theme. This means that any rule in the custom theme’s style.css overrides the corresponding rule in the default style.css.
The blue, red and green custom themes that come with WPMP are very simple and only contain a few additional CSS rules that change the header and footer background colors and the colors of buttons and links. You can change much more by adding more rules to your style.css, including changing the colors of any element and adding and removing borders.
I’m not going to tell you how to do that as I’m woefully under-qualified to teach you CSS. I had to bumble around in style.css trying this and that until I got the effect I wanted. I don’t recommend doing this on your live blog (I use a separate test blog for experimentation) but the nice thing about modifing CSS is that although you can make things look ugly real fast your not going to completely break your blog so that it doesn’t load at all like you can tweaking PHP code.
It wasn’t always easy for me to figure out what I need to add or change to achieve the desired effect. But I found two tools that really help; Opera Dragonfly and the Edit CSS tool that’s part of the Firefox Web Developer Plug-in.
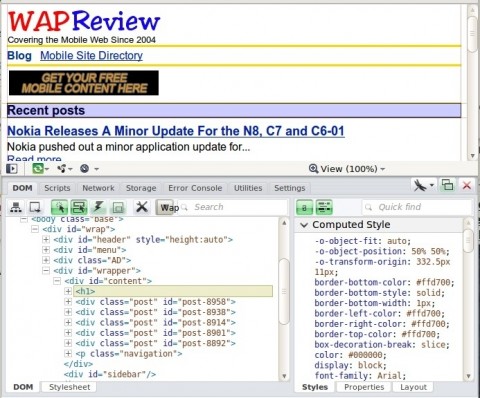
Opera Dragonfly (image, above), comes with the Opera browser for all PC platforms. It’s a powerful JavaScript debugger and DOM and CSS analyzer. The feature I use and love is that it lets you click on a page element and see exactly which CSS rules apply to it, including any overwritten rules. To use it, open the mobile version of your blog in Opera on your PC and launch Dragonfly. In Opera 11, which is what I’m currently using, Dragonfly is in Menu > Page > Developer Tools. Using the default DOM tab in Dragonfly’s left hand window, click the “Find element by clicking button” (an arrow pointing up and to the left at an asterisk) so that the button turns green and then click any element on the page. The CSS rules that apply to that element will be shown in the right hand Dragonfly window complete with the name of the CSS file each is found in. Overridden rules are indicated by a strikeout font. A check box next to each rule lets you temporarily disable it.
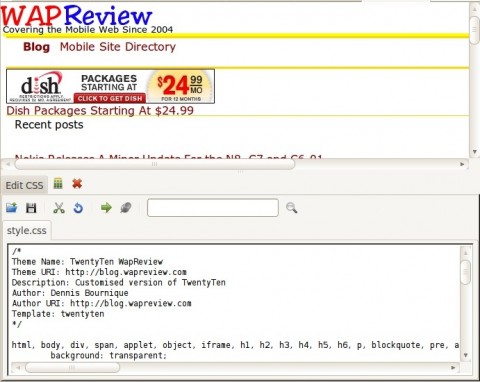
Once I know which rules I need to override I use the FireFox Web Developer plugin’s Edit CSS tool (image above) which lets you modify any of the current page’s CSS files on the fly and see your changes reflected immediately on the live web page. The tool changes the CSS rules in memory so they are temporary but you can save the modified CSS to a local disk file and upload it to your Web server once you are satisfied with the way it looks.
If you use the Nokia templates feature of WPMP you also need to copy style.css.nokia.css from mobile_pack_blue or one of the other custom themes included with WPMP and modify or add to the rules in it. If the Nokia templates are enabled and a Nokia handset or a device with a WebKit based browser like the iPhone visits you blog WPMP delivers four stylesheets; sytle.css and style.css.nokia.css from the base theme followed by the equivalent stylesheets from your custom theme. So changes you make in either of your custom theme’s CSS files overide the corresponding default ones.
Custom WPMP themes aren’t limited to just changing CSS. You can copy any of the base theme’s PHP files, except functions.php, into your custom theme and modify them. If WPMP sees a PHP file in your themes folder which the same name as one of the files in the default folder, it uses it instead of the default. For example you can modify header.php to add a logo image or insert an ad at the top of the page. Or you could modify footer.php to add a Google custom search box at the bottom.
A few caveats, don’t copy all of the files in the base theme into the custom theme. Only copy the ones you want to modify. And unless you are fairly proficient in PHP don’t modify or copy functions.php as it requires special handling. If you feel up to it, the rules for modifying functions.php for WPMP are the same as they are if you are creating a regular WordPress child theme. There are a number of articles on the web that deal with this topic. Start with Child Themes in the WordPress Codex. Other posts I found helpful are Themeshaper’s How To Modify WordPress Themes The Smart Way and Understand WordPress Child Theme by WP Engineer.
And finally don’t experiment with your main blog, at least not if you have any visitors. As anyone who has done any programing will tell you, no matter how experienced you are, it’s really easy to screw things up so that nothing works. Create a separate test blog on a sub-domain and get everything working there first before copying your new custom mobile theme to your main blog.


Hi there Dennis.. Thanks for all these clues that you’d provided to make a custome mobile theme, how ever it’s still a bit confusing… is there any way for you to make a video tutorial for it, if it’s too much asking???? Good day…
Hi there Dennys, still waiting for an answer, but i have another question for you,,, How do you fix this plugin in a way that a mobile visitor can comment and send me a message through my contact form??? ’caused it’s not working…. Thanks…
I use this plugin: https://wordpress.org/plugins/wp-contact-form/ to generate a contact form. It works with WPMP.
Will try it out…. Thanks….
hi dennis, may I ask again?
how to remove menu or edit it in wordpress mobile pack?
Use grep or windows file search to find which file the code is in and then use a text editor to change it.
oh..yeah i have success to edit wpmp_switcher.php.
thanks Mr. Dennis Bournique
Hi,
Did you manage to exclude some pages from the menu ? Could you help me doing this ?
Thanks,
Diana
I’m sure there’s a more elegant way but I just hard coded my menu into header.php in my WPMP child theme folder.
hei, how to replace word ~switch to our mobile site~ in default theme?
That phrase is in wp-content/plugins/wordpress-mobile-pack/plugins/wpmp_switcher/wpmp_switcher.php You can edit it there.
Hey Dennis
How to add thumbnail in Wpmp?
Modify index.php in your custom WPMP child theme and add:
if ( has_post_thumbnail() ) {
the_post_thumbnail(‘thumbnail’);
}
inside the loop.
Hello, please what do i have to do not to show the default sample page when the mobile theme is shown? I just want to replace the text or even better omit this sample page, as i understand that the content cannot be edited for this sample page. Thank you
Sample page? I have no idea what you mean. The mobile front page is your blog timeline. If you want to change it, modify index.php in your child theme directory.
Thank you very much Dennis. I just followed your tutorial and got it working for my wordpress blog. One thing i like about WPMP is that It loads faster. Do you have any idea how i can put facebook comment and social share buttons on it? Thanks
I don’t use Facebook comments or the social share buttons. Have you tried installing one of the Facebook plugins? I installed the Plus One plugin and the Google+ share button shows up on my mobile pages.
If the plugin doesn’t work you will need to paste the Facebook code into index.php or footer.php in your custom mobile theme folder. I haven’t done it so I can’t give you more specific instructions.
I built a child theme for my desk top version using twenty eleven. Two of the pages have their own templates with html and php that creates inputs, buttons etc. How do I get WPMP to show this page template info. Do I have to stuff all the page template code into a mobile child theme php and then test what page I am on to do the correct template code. I don’t get it. Thanks for you help
That is correct, you have to create a separate WPMP child theme and modify its style.css as described in the post to point at one of the WPMP base themes.
WPMP doesn’t have a page.php, it uses index.php for both posts and pages. So you need to copy index.php save it with a different name.
Then add the your custom page template name to top of your cloned index.php
/*
Template Name: Uploader
*/
And add your custom form code to it just like you did for the cloned TwentyTen page.php
Then select your child mobile theme in the Mobile Theme switcher in the WordPress Dashboard.
Hi,
What do I need to do to add a logo in the header as shown in the image above (WAP Review)?
Regards
Thanks
Modify header.php and add the following just below the openning <body> tag:
<div id=”header”>
<div class=”logo”><a href=”<?php echo get_option(‘home’); ?>/”><img src=”http://yoursite.com/images/yourlogo.jpg” alt=”YourSite.com” /></a>
</div>
</div>
Pingback: WebTechWise » Blog ArchiveWhich WordPress Plugin Do You Use for Mobile Phone Compatibility?
hey James,
wpmp is wonderful plug-in, but it does not fully support to different post type.
so please include that facility in your future versions.
Hey Dennis – thanks for the coverage.
I’m planning to make this whole thing easier too. We are well overdue a v2.0 …
Your welcome. I’m always happy to plug a great webapp like WPMP. Looking forward to 2.0.